Wednesday 29 November 2017

10 MIN LOVE HANDLE WORK OUT

10 MIN LOVE HANDLE WORKOUT

Repeat the following circuit 3 times, moving as quickly as possible from exercise to exercise. Do this routine 3 times a week.
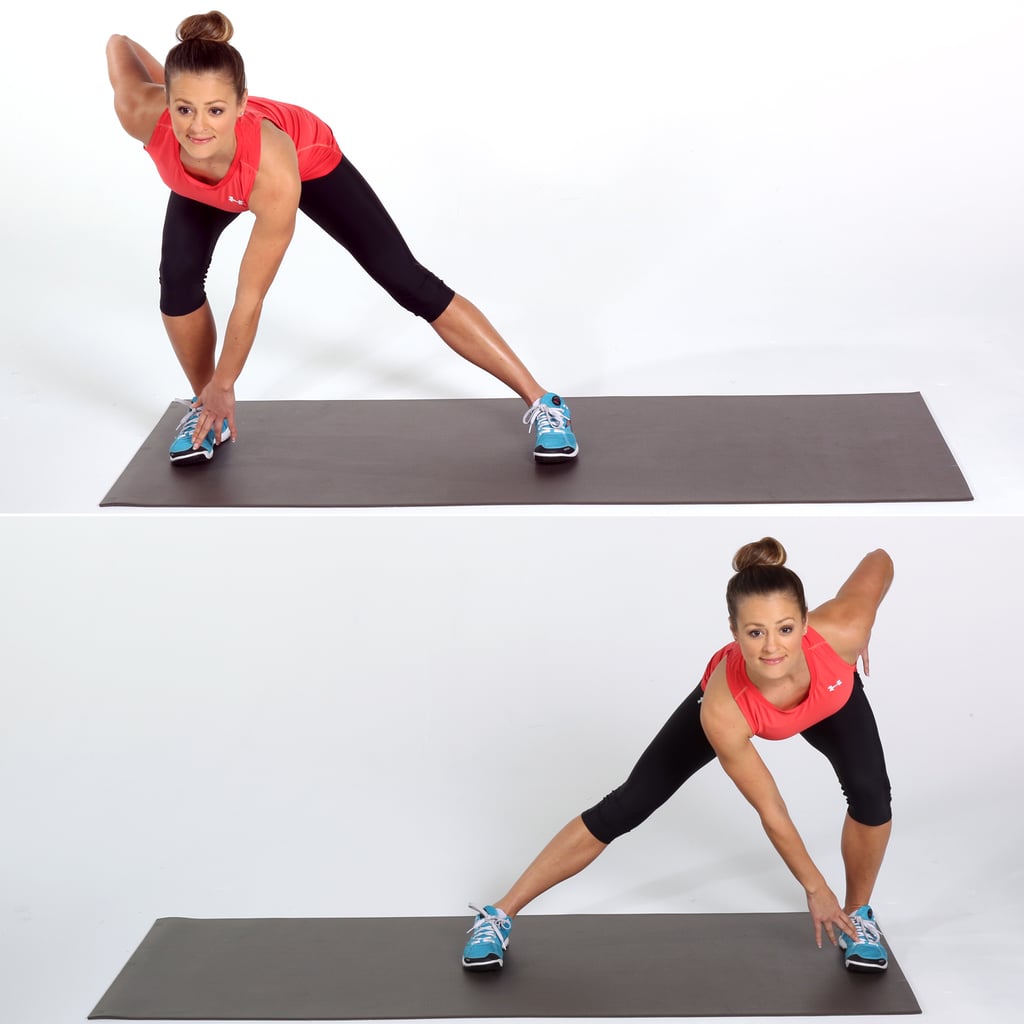
1.40 Woodchoppers (20 on each side). Using one hand weight, stand with your feet hip-width apart with your weight on your left leg. Start by holding the weight in both hands up by your left shoulder. Next, twist to make a chopping motion down towards your right hip. Allow your feet and knees to pivot with the twist. Raise the weight back up to your left shoulder and repeat for 20 reps. Next work your right side.

2.50 Russian Twists. Sit on your butt with your knees bent and feet flat on the ground. Your torso should be leaning back at a 45 angle to the floor. Hold a dumbbell with both hands. Lift your feet from the ground, crossing them at the ankles and balancing on your butt. From this position, twist your torso to the right and touch your dumbbell to the ground next to your body. Next, twist back over to the left touching the weight to the left side of your body. Repeat back and forth, all while balancing with your legs and torso raised off of the ground.

3.30 Side Plank Hip Lifts (15 on each side). Get into side plank position with your elbow on the ground and your legs and hips resting on the ground. Engaging your abs and keeping your body in a straight line, raise the lower half of your body up off the ground into a straight plank position. Lower again and repeat. Do 15 on your right side, and then 15 on your left side.


4.Bicycle Crunches. Lie on your back with your knees bent and your hands behind your head. Do not clasp your hands together. Engage your abs, lifting your shoulders and upper back off of the ground. At the same time, move your right elbow toward your left knee so that they meet in the middle of your body. Next, switch your position by bringing your left elbow to your right knee. Continue as quickly as possible while still keeping your torso raised up off the ground.

7 BEST EXERCISE TO SHAPE UP YR FACE

7 Best Facial Exercises To Slim Down Your Face


While it is true that beauty lies in the eyes of the beholder, all of us still desire for the best features for ourselves. And perfect cheekbones certainly are one of those important features of face that define its beauty. However, not all of us are blessed with naturally perfect cheekbones. And for many of us, even getting a plastic surgery done to artificially improve our features is also not an option.
But, you need not worry even if you can relate to both of these situations. All you need to do to get the perfectly shaped cheekbones are some facial exercises. So, here are some of the best exercises for your cheekbones that will give your face a leaner and prettier look.

#1. Jaw movements

While sitting straight, make your lower jaw drop down as much as possible. Next step is to jut out the lower jaw, to build tension in the cheeks near the ear area. Feel the tension for about ten seconds before relaxing the jaw, and bringing it inwards.
Repeat this exercise ten times.

#2. Smile says it all

Smiling can also prove to be an excellent exercise for your face. All you need to do is smile widely with your mouth closed. Remember, the lips should not be parted. After holding the smile for ten seconds, bring your face back to the relaxed position.
Doing this exercise everyday will not only uplift the structure of your face, but will definitely lift your mood well

#3. Xs and Os

This is a great exercise to burn the fat from your cheeks. All you need to do is to make exaggerated motions using the facial muscles while pronouncing the letters X and O alternately.
Doing this exercise ten times every day will help strengthen the muscles as well.

#4. Tongue movement

A good way to work on the muscles below the apple of your cheeks is to do this exercise. It involves sticking the tongue out and stretching it as if you were trying to touch the chin. Hold this pose for ten seconds, and feel the tension in your muscles.
Repeat this ten times.

#5. Cheek lifts

You must do this exercise in case you want to work on the upper muscles of your cheeks. It will give your face a leaner look as well. Firstly, pull the cheeks upwards towards the eyes without making any change in the position of your lips. The second step is to push the cheeks up from below while raising the corners of the lips.
Repeat this exercise ten times to get best results.

#6. Fishy (Pout) face

To work on all the areas of the cheek simultaneously, making the fishy face is the best option for you. All you need to do is purse your lips while sucking in your cheeks to resemble the fish face. While in this position, try to push the outer corners of your lips up into a smile. Hold this position for ten seconds and relax for a while.
This exercise will not only be beneficial for cheeks, but also for your jaw.

#7. Puffy face

Give the muscles of the upper and middle portion of your cheeks a good workout by performing this exercise. With your lips closed, puff your cheeks with air. Alternately move this air from one cheek to the other while holding the air in each cheek for five seconds

These exercises will not only help you to achieve the perfect cheekbones, but will also make them stronger. However, do not forget to combine these exercises with appropriate diet that will bring a glow to your perfect face.

EXERCISE TO TIGHTEN UR BODY AFTER WEIGHT LOSS

Exercises to Tighten Your Body After Weight Loss


Sometimes when you lose weight you also gain loose skin. This problem most often develops in your face, neck, under arms, abdomen and thighs. Some exercises can help to tighten these areas. Each exercise is designed to not only tighten the skin but also to tone and firm your muscles, which also reduces the appearance of sagging loose skin.

Neck and Chin

Loose skin on your neck gives the appearance of a double chin. Doing exercises that focus on this area of the body tones and tightens the muscles, which eliminates the appearance of sagging skin. To begin one easy exercise, stand with your arms at your side. Tilt your head back until you are looking directly at the ceiling. Do not strain your neck. Open your mouth and close it, slowly touching your teeth together. You can feel a slight pull on the muscles of your chin. Repeat this exercise five to 10 times per day for optimum resu
ARMS
As you lose weight, the skin under your arms becomes loose and sags. Overhead stretches help to tone this troublesome area. Simply sit comfortably with your back straight. Hold one dumbbell in each hand, resting them down at your sides. Raise your arms straight out in front of you with your palms facing inward. Slowly lift the dumbbells straight up so they are above your head. Bend your elbows; your hands should be behind your ears. Hold for five to 10 seconds and lower your arms. Do 10 to 12 reps every other day.

ABS

Exercises such as crunches tighten and tone the muscles in your abdomen to help trim unwanted skin. Perform a basic crunch by lying on your back with your knees bent at a 90-degree angle. Interlock your fingers and place them behind your head. Without bending your neck, slowly raise your head and upper back off the floor. Hold for five seconds and return to your starting position. Repeat 10 to 20 times.

LEGS

Excess skin may accumulate on your inner thighs. To address the saggy appearance, lay on your left side with your left leg straight and your right leg bent at a 90-degree angle and in front of your left leg. Prop yourself up on your elbow. Keeping your left leg straight, slowly raise it until you feel a slight pull in your inner thigh. Hold for five seconds and return to your starting position. Repeat 10 times and move to your left leg.

Additional Information and Warnings

Before you begin any new exercise routine, consult a medical professional. While these exercises may be helpful in toning and tightening your muscles and help to diminish the appearance of loose skin, a healthy eating plan in conjunction with daily physical activity increases your chances of maintaining your muscle mass and current weight.

7 BEST EXERCISES FOR THIGH WITHOUT EQUIPMENT

7 THIGH EXERCISE THAT DONT REQUIRE EQUIPMENTS


bodyweight thigh workout

How it works: Perform each exercise for the number of reps indicated, then repeat the entire circuit 2-3 times. Watch the above video to see Jenkins demonstrate a step-by-step breakdown of each move.

Plié on Toe

A. Start standing on toes with feet slightly wider than hip width apart, toes pointing out, arms reaching toward the ceiling.
B. Bend knees to lower into a plié squat, lowering arms to sides.
C. Return to start.
Do 16-25 reps.

Image result for pic of plie on toe


Chair Pose with Reverse Lunge

A. Start standing with feet together, big toes touching. (Beginners can stand with feet hip-width apart.) Inhale and raise arms overhead so they're perpendicular to the floor, elbows close to ears. Slowly lower into a squat, bringing thighs as parallel to the floor as you can. This is chair pose.
B. Step right foot back into a reverse lunge. Return to chair pose.
C. Step left foot back into a reverse lunge. Return to chair pose.
Do 20-30 reps, alternating sides.


Image result for pic of chair pose with reverse lunge


Chair Pose with Side Tap

A. Start in chair pose, as described above. Allow your arms to gently rest on top of thighs.
B. Tap right foot out to side, opening arms out to sides. Return to chair pose.
C. Tap left foot out to side, opening arms out to sides. Return to chair pose.
Do 20-25 reps on each side.


Stationary Lunge with Twist

A. Start standing with left foot forward, right foot back.
B. Lower into a lunge, raising arms to sides so they're parallel with the floor.
C. Twist upper body to the left to bring right arm directly above left leg and left arm directly above right leg.
D. Reverse motion to return to start. Complete 20-25 reps.
E. Return to standing. Switch legs so right foot is forward, left foot is back.
F. Bend knees and lower into a lunge, raising arms to sides so they're parallel with the floor.
G. Twist upper body to the right to bring left arm directly above right leg and right arm directly above left leg.
Do 20-25 reps.Image result for pic of lunge with twist


Add Pulse and Medial Delt
A. Start standing with left foot forward, right foot back.
B. Lower into a lunge, raising arms so they're parallel to floor with slight bend in elbows.
C. Do three knee-bend pulses.
D. Straighten knees and lower arms. Switch sides.
Do 20-25 reps on each side.


Image result for pic of add pulse nd medical belt for legs

Outer Thigh Leg Lift

A. Start with feet together, arms lifted overhead, reaching toward ceiling.
B. Raise right leg to hip height while lowering right arm to touch toes. Return to start.
C. Raise left leg to hip height while lowering left arm to touch toes. Return to start.
Do 25 reps on each side.


Sweeping Side Lunge

A. Start standing with feet hip-width apart, arms down by sides.
B. Step left foot out into a side lunge, reaching both arms to the left.
C. Push off of left foot to stand on right leg, lifting left leg up to a 90-degree bend while sweeping both arms toward floor, right, then toward ceiling.
Do 15-25 reps on each side.

Image result for pic of sweeping side lunge


4 STANDING MOVES FOR A SUPER FLAT STOMACH

4 Standing Moves for a Super-Flat Stomach

,

You can get a stronger center without unfurling an exercise mat. In fact, the standing abdominals routine below hits all of the muscles that make up your core, from your abs to your hips, your pelvis to your lower back.

Check out the four exercises in our handy video and pin-able graphic. . Just complete three or four sets of each exercise as instructed, resting for 30 seconds between sets, two or three times a week. Flat belly, here you come!
 
Daily Yoga with Chris Freytag: Bridge into Wheel
0:54
/
1:03
Loaded: 0%
Progress: 0%